Manufacturers rough openings should be as close to the correct size as possible. Rough openings should be square and not have any protrusions, uneven surfaces or jagged edges which could impede the proper seating of the RV window. The radius corner blocks should be 3-5/16" radius. An oversize radius block could cause the RV window to be tight at the radius. An undersize radius block could create a gap or minimal seal on the outer flange at the radius.
Exterior surface around RV window opening should be flush. This includes the surface under the siding. If shims, etc. are used around the opening, they should be used around the entire perimeter, including the radius corners. The siding should be as flush as possible. Raised ribs and splice joints in the siding must be crushed as small as possible.
Ensure that spacer clips are still in place on the RV window jambs and sill. There should be two on the sill and either one or two on each jamb. If these blocks are not in place, insufficient lap of the flange may occur. This could cause the unit to leak between the RV window and the wall. Without these clips, it also makes it much harder to install the clamp ring.
If there are dents in the flange of the RV window, they should be straightened before applying sealing tape. Sealing tape should be applied around the entire perimeter of the RV window flange.
When inserting RV window into opening, you should be able to do so without the use of any tools. If major resistance is incurred, do not force. Remove RV window and check rough opening size and RV window size. Forcing window into opening will only distort the unit and cause it to be inoperable. This is particularly the case for egress units.
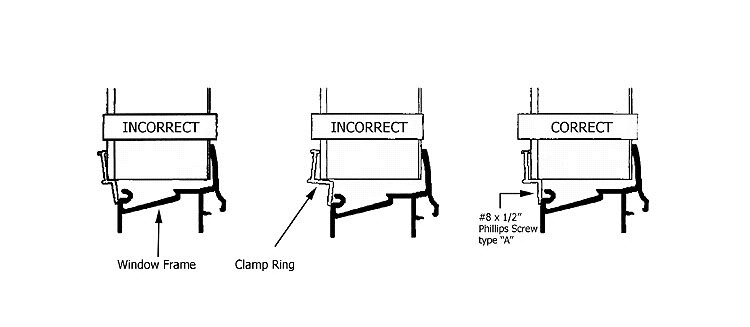
If you have a thin wall installation, read the next paragraph before returning to this paragraph. Insert clamp ring into the rough opening. Clamp ring should nestle down inside of the hole around the entire perimeter. If this does not occur, check the rough opening and the size of the clamp ring. Ensure that you can see at least part of the groove on the main frame of the RV window through the holes in the clamp ring. Install two screws on the each jamb at about the center of the RV window. These screws should be partially driven in. Driving the screws in all the way may result in stripped threads or heads popping off. Install two screws at the bottom center of the RV window in similar fashion. Repeat at the head of the RV window. At this point, you may tighten these eight screws the rest of the way . Continue around the perimeter of the RV window, installing the remaining screws. Check operation of the RV window to ensure that there is nothing in a bind.
With a think wall installation, the clamp ring will telescope over the window. Place the clamp ring over the RV window and make sure that is fits down over the entire RV window before attempting installation. If it does not fit over the entire window, check the RV window and clamp ring sizes. Follow the procedure in the above paragraph for correct sequence of screw installation.